Follow my blog with Bloglovin

Tuesday, August 30, 2011

Grurple Leopard Print!

I know...but that was the best I could do on 5 hours of sleep and not nearly enough caffeine :0)
I have a few pics of my Sunday/Monday/Tuesday mani and then the one I just finished...it's cool! The first one...not so much, heeheeeheee! But dessert first! YUM!


I wanted to try out the leopard print BM plate finally....and I made myself NOT copy all the pretty summer manis out there...yellows, oranges, etc....Even though I really wanted to-those look awesome! So I went with SH Mint Sorbet, Orly Charged Up, and Sinful Colors (cripes, now I have to get the bottle!)Ahhh, Last Chance!! I love that deep rich green.


I did a diagonal stripe with Charged Up, but it's fairly runny and sheerish, so in hindsight, scotch tape would have helped me get a nice thick layer the first time around. It took a few swipes with the brush, look-
Too pale!  I also did the SH  Mint Sorbet on the opposite side, not worrying too much about neatness and this is why!

Last Chance covered the imperfections. I actually planned the purple for the middle, but that is where the lack of sleep kicked in-grrr.

Then a quick coating of some cheapy little BonBon blue-green glitter that I got for frankening.
I almost left it there...pretty! But I wanted to see how the leopard print did across the glitter. I used Wet N Wild Black to stamp with, and it works pretty darn good! I just realized (light bulb moment) that I have been pressing WAY too hard on my scraper and stamping tool to pick up the pattern...I think I have been actually pushing the polish out of the plate pattern and making it look funky-hmmmm sometimes too little sleep can be enlightening...
So again, the finished mani with SV over the top-A little darker thanI wanted, but still pretty in my opinion.


It's Grurpalicious! Try saying that five times fast and see if you don't get arrested! Hahaha..
OK, now the boring mani...pretty, but boring
That's it...I did add a leopard print in black on my ring finger last night and THAT looked pretty cool...That is one that bears repeating...stamping over a holo polish-niiiice!
Hey, did ya notice my cuticles? I followed a fellow blogger over to loodie loodie loodie and she has an awesome site if you want to learn about nail care. I took some of her advice to heart and found a product hanging around that I multi-purposed and started using on my cuticles and hands (feet too, btw) and my hands and cuticles are looking amazing, I think. Amazing because my hands have always been ultra dry with mangled cuticles. My mom taught me to push my cuticles back regularly, but that only goes just so far. At any rate, the constant moisturizing with this mixture of vegetable/vegan oils has really helped. Three Cheers to Loodie!! (Even my crazy little piggies look better for the moisturizing!)
OK, enough blather, have a great night and stay dry, smoke free and safe, where ever you live (we have forest fires here)


Saturday, August 27, 2011

Angry Birds practice, woot!!

I wanted to try this for a few people, my friend Saundie and the Nail Nerd :0)

Damn, these little guys are hard to paint....not bad for my first try, though?!


LOL...I may have to try these on a weekday when I know the big boss won't be in the office, LOL!
Let me know what you think...worth doing more of, or do they stink?!

Subtle French Mani with Flakie franken

After my last manicure, I felt like I should go subtle...but I think I went to subtle! My 18 year old told me it was boring, LOL!
A few posts pack, I posted about adding flakies to sheer-ish polishes. I used one in this mani.


In some of these you can see the subtle flashes of flakie goodness, but it doesn't come right out and bop you on the nose, LOL! I added some accent flowers with a dotting tool and  tiny gold balls. Very lady-like very calming...BORING was right LOL!
Then I was stupid and realized I still had to give my dog her medicine, because she is terrified of most loud-ish noises...TERRIFIED...so not worth missing a dosage. Here is the damage...
It was worse, but I licked a finger and smoothed the heck out of it....this I could live with for a day (french mani's never last long with me, the white starts looking "dirty").

Several weeks ago, we installed a new door in our house and my hubby took a picture of me using a router to cut a spot for the faceplate on the door. I didn't plan on putting it up here, simply because I look like hell, the house was messy behind me and really, who wants to see a 40-something lady sweating over a doorknob installation?! Ah, well, It might explain something about me...I LIKE doing stuff like this, I can change the oil on my car and even replace a few parts, and I am the one that explains things to the mechanic. My husband is pretty proud of this, I think and my sister-in-laws a little weirded-out, LOL. That's OK-I like doing things for myself and I don't have issues about husband and wife "jobs" in the home. Legacy of being the youngest of five with 3 older brothers.
*sigh* yah, not a petite lady...lol! Have a great one!

Monday, August 22, 2011

Wow!

I simply couldn't think of a good name for these, short of WOW! They did take extra time because of the scotch tape and layers, but so worth it in my book. The purple (and really, it is purple no fooling) I got from ABOP's blog sale and it is Quirius Eggplant. I didn't know it had that awesome blue flash until I put it on, and it's growing on me I can tell you! First the finished mani and then how I managed to pull it off, LOL!

Seriously sexy nails in my opinion. I like bling, but glamorous is really not me...and this screams GLAMOUR!
So here is the how. Let me show you this polish and see if I can capture what it actually looks like on my nails (not blue!)
OK...purple, right??
2 coats of QRS Eggplant, and let it dry really well for awhile...I rushed things and almost ruined it.


The I used scotch tape to make a diagonal line across my nails. I just do one at a time....much easier.
On the untaped side, I coated Nubar 2010 and pulled off my little strip right away. It works best if you cut the tape into thinner strips. When it is a big piece of tape, it doesn't seems to adhere on the diagonal very well--too sharp a curve going.
I coated my nails once with Orly Sec-N-Dry, let that cure for about 10 minutes and then cut thin strips of tape to make a little stripe of gold right over the edge of the diagonal line, and I have a picture below...
Pretty easy to see the problem areas on dark polish....the places where the tape is lighter, you may have some polish bleeding under the tape, so try and press things down pretty well. I used Revlon Gold Coin along that stripey area and pull them off before they dry. One at a time seems to work well....keeps messes down. I just snag the sticky edge of the tape on my work table-clean it up later when everything is dry. As long as the groove between the 2 pieces of tape looks even and straight, you should be fine. I can't draw a straight, even line to save my life...so this was my solution.
YAY! They turned out so awesome!

Monday, August 15, 2011

Summer Lights Mani and marbling progress

I decided to try some water marbling before I removed my Salty Margarita polish....but first, my finished creation! It turned out So cool!
OK, down to business...

Here is what I used, in order.
I did 2 coats of white as a base for this, not sure why, it just seemed right. Then I sponged on the Sinful Colors blue cream diagonally, and added the SH green diagonally also...leaving a white swatch in between. The SH yellow added sort of wherever and the same with the Nina Ultra Pro frosty blue. I made a sparkly topcoat franken that has blue, green and gold tiny glitter, and little black specks that aren't glitter, but just there, lol! That went on top of this mani, though. Here it what it looked like before my sparkly franken...

I liked it like this with no sparklies! But alas.... you know me and bling!
2 coats of my blue/green/black franken TC...


The camera wasn't picking up the glitter at all, it seemed like. It isn't heavily glittered, though. I used some old SV as a base for this franken. Man alive I love how this looks, though! 2 heavy coats of SV to gloss the heck out of this.
Now, here is my progress in water marbling. This try seems to have eliminated the "blob" effect, since the polish spread out better this time. I was so happy with how it was coming out I did three over my previous mani so that I could be sure it wasn't a fluke, lol!
I think I will get some distilled water for my next try, since we have well water and it's pretty hard...that might help the polish spread out more, because that still seems to be an issue. But I am happy that I am improving at this, for whatever reason....but I do want to know what is making the difference!

Oh, and I would love some feedback on helping get my nails stronger. I bought this nail strengthener on the first pic...we'll see how it does. Does anyone out there use anything specific they like for helping nails grow/get stronger/split less?

Friday, August 12, 2011

"Salty Margarita" Franken and subsequent mani!!

OK, I confess, I saw one of the new Barielles on one of the sites I follow  (Candy Coated Tips) and I was highly intrigued by a  nude colored-flakie polish ...not clear...NUDE!!!I didn't know the flakie goodness could show through. SO of course I had to try this, I had some pretty sheer french mani colors floating around (doesn't everyone?!)
Tried the palest pink/beige one, liked it, made one for my friend, but then I got this wild hair and added Nubar 2010 to this polish, a sheerish day-glo green that was cheap and a liquid staining machine. I like the way it looked and couldn't leave well enough alone...good thing!
I added a bit of my new fave glitter, Sinful Colors, It's All About You...OMG!!!! Yah, I am loving this stuff!!! Check out the mani first and then the ingredients. You might be able to see the flakies better if you click on the picture...


1 base of white polish, then 2 of Wet N Wild Sunny Side Up (orange) and 3 coats of my new Salty Margarita franken :0)


What do you think?  AWESOMENESS in a bottle?!?? Yeah, I almost did an "Angry Birds" mani...that will be another weekend...but I wanted something equally silly/bright. I do believe I succeeded!! I can't quite get away with something this wild at work (actually, I probably could).

Wednesday, August 10, 2011

Coral Bling-O-Rama!

Holy Cow, I bought some polishes today and 2 of them are almost made for each other, I swear!
I picked up some Sinful Colors and brought those bad boys home to drool. And drool, I have! I decided to pair SC Timbleberry and It's All About You. SC Timbleberry is a pretty coral/melon-ish cream and SC It's All About You is the frosting on that cake! There are little bits of almost the exact same coral color in the golden-greeny goodness....make sure you click on the pics to see all the lovely details.

2 heavy coats of Timbleberry, except on ring finger...2 coats of Revlon Gold Coin. Then 1 coat of IAAY over the coral-ish...2 coats over over the Gold Coin/accent nails, though....


Before the layer of IAAY. My camera didn't capture the real coral goodness of Timbleberry, darn it!


Would you just look at that stuff?? Looks awesome over neon green, too, by the way! Tough choice tonight!

Commence Drooling. Nuf said :0)


Monday, August 8, 2011

Ho-Hum Starburst Mani

I went garage-sale-ing this weekend and found 2 polishes in some bins for cheap, so I bought them thinking they would be cheap for frankening or just the bottles. One was an Essie and one was a Maybelline that I decided to put on last night. Turns out, it's too pale for me, but it is still a cool color. I had no idea how old this thing was, but for the price, I was willing to try.

I put 2 coats of Maybelline Mo' Money Mauve and it was supposed to be a speed dry, but it was NOT. Then I decided it was too pale and something had to be done. So I did a scotch tape star burst with OPI Mother Road Rose-a truly awesome color in my stash. Here ya go....


These colors look amazing together, I thought. You might be able to see some of the colors that made me like the Maybelline polish...alas...just too darn pale for my taste! And the formula-could be it's age-is terrible. I added some polish thinner, but it still took forever to dry. I thought I would wake up to pillow-case nails, lol! (anyone else here missing the "mauve" in the color?!)

Saturday, August 6, 2011

Christmas Lights Mani & a peek at my jewelry-making

I have found that I need a tough mani every weekend. If I don't polish my nails, they break, and if I put something on that can stand up to my weekends, I am happy!

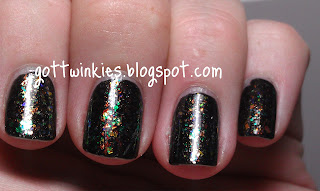
Flakies and glitters wear like armour, I have found. I have worn flakies on a calf-branding weekend with no breakage, and this is the kind of tough I need in the summer. One thick coat of SH Black Out, covered by 2 coats of ABOP's flakie franken and 2 coats of top coat~Viola! I have Christmas on my nails! Look at that flash!


*Sigh* I love my pretty little glittery things! The black base allowed me to see all the colors in this flakie polish-lovely.... Oh, and these pictures are after house cleaning and a few days of wear-so please ignore the state of my cuticles and skin!

On to the jewelry! I made this bracelet several years ago and adore how it turned out. I stitched the already-beaded bracelet very painstakingly onto a piece of white lambskin suede and used buttons as a clasp. This is my design and -please- not to be copied without permission. The beads are technically called charlottes, but I have always called them cut-glass beads. They flash and  glow in the sun while I drive and that is why I decided to post this....between the Northern Lights mani and the bracelet, I was probably not the safest driver on the road that day :0)


OK, when I said I stitched it "painstakingly"...that translates to: stitched on the first time, but it didn't drape right, stitches pulled out and 2nd try-different method, still didn't drape right-stitches pulled out carefully again! Third try was the charm! YAY! The beaded bracelet drapes like soft, heavy fabric-perfect!

Monday, August 1, 2011

Franken Mani! (and cool rocks, too!)

We went crystal hunting in the mountains nearby, so that is what the rock comment is all about, LOL! Anyways, on to the mani! ABOP suggested trying my new frankenpolish I purchased from her blogsale over one of my frankens...so I did!
2 coats of my dusty blue franken and 1 coat of ABOP's flakie franken. This stuff is gorgeous, not too thin, not too thick and goes on like a dream. I don't know about your luck, but whenever I buy a glitter or a flakie polish, it is as thick as molasses and not nearly as yummy! At any rate, she has 1 of those frankens left as of this posting, lol...
Here is my blue franken again...

A bit blurry...but such a pretty color...
Now for the bling!

My free handing on the silver stripe stinks...oh well! I mostly wanted to see how well  the flakie polish did with a scotch tape line. It did nicely! No little flakie bits hanging over into the rest, but I think it is because ABOP used various sized flakies in her franken.


And this is one of the funky cool rock formations we saw while driving. The dark shadow you see near the bottom is a gap that was big enough to crawl into, kinda cool I thought. There were these amazing monolithic rock formations all over the area, so cool.  I did find some crystals and one fairly nice 1cm smoky quartz that should make a nice pendant for someone :0)